DeFoe Technical Services defoetech.com youpod.biz


Instructions for A-Minima Color CCD Video Tap:


DeFoe Technical Services Color CCD Tap For Aaton A-Minima 02-2009   
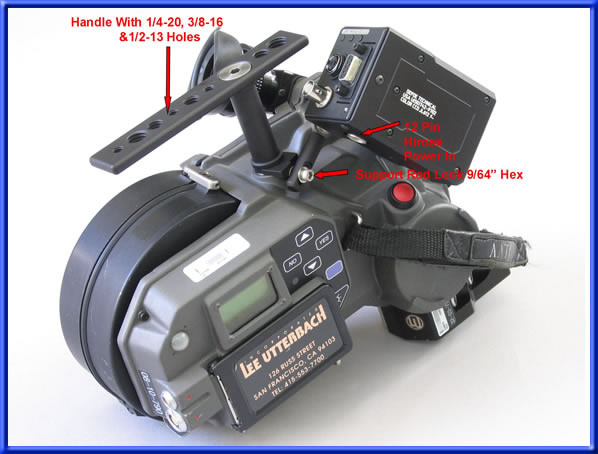
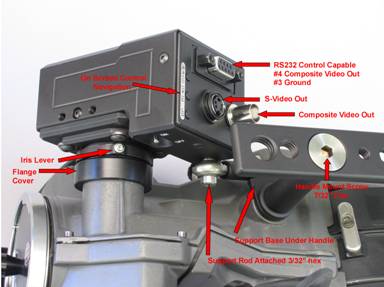
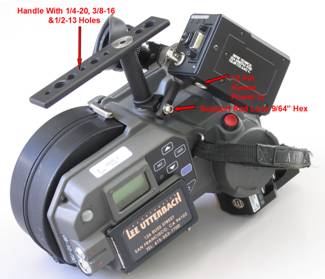
     Aminima Tap Aminima Tap
                                        Aminima Tap  Aminima Tap

Installation:
      If an Aaton B&W tap is in place it must first be removed. If not present proceed to step one. Removal of the Aaton
      B&W tap: With 2 mm hex tool remove 2 black case screws on the video camera and the silver case screw near the
      BNC the is outboard. Gently remove the case lid but realize you have short delicate wires limiting movement. Unplug
      the  3 pin wire harness (Green Red & Black wires). Use 2mm hex through the access hole in the PL mount throat to
      loosen the internal clamp. Loosen the external ring that connects the video camera to the film camera (near the iris  
      adjustment of the video tap lens). Carefully withdraw the video camera assembly from the film camera while guiding
      the 3 pin wiring harness out through the lens axis until the video camera is free. Bundle the excess length of the
      wiring harness coming from the film camera. Wrap with heat shrink or electrical tape. Tuck this neatly inside the film
      camera video port off to the side to not interfere with inserting the DT lens assembly into the round clamp.


      Installing the DT color tap

  1. Remove the video port cap if present. Thread on the supplied black plastic Flange Cover hand tight.
  2. With 2mm Lens Clamp screw loose, mount the tap assembly @ angle pictured (best if support assembly attached).
  3. Temporarily secure the 2mm clamp.
  4. Power and monitor the video camera. With the video iris open, adjust the focus to ground glass lines.
  5. Loosen the 2mm clamp and rotate the video camera to level the image. Re-tighten the 2mm clamp.
  6. To adjust image centering loosen  4 x 3/32” hex screws and slide the video camera to center and level the image.
  7. Then re-tighten the 4 x 3/32” hex screws.
  8. Loosen Support Rod Lock slightly.
  9. Mount the handle with the support rod base under it. Secure it with the large 3/8”-16 screw just snug but not tight.Tighten the Support Rod Lock in place with 9/64” hex wrench.
  10. Rotate the handle to desired angle and tighten the large 3/8”-16 screw with a 7/32” hex wrench.
  11.  If further centering or leveling trace adjustments are needed loosen the Support Rod lock first and repeat 5-10
  12.  Recheck the focus adjustment.

General Use instructions:

  1. Use the iris lever for optimizing light levels in coordination with the gain and sensitivity settings on the video camera. Moving it camera forward is stopping down.
  2. The 3/32” hex screw that is gold in color on top of the lens assembly allows implementing an internal ND9 gel filter that gives approximately 3 stops light reduction which may be desirable in bright circumstances  and slow film. Turning the 3/32” gold hex CW will engage the 3 stop reduction. Turning it CCW will disengage the ND filter. Operate this screw with a alight hand. Stop when you reach the end stops. If you turn the screw hard against the end stops you could damage the internal mechanism.
  3. Focus adjustments of the video tap should not be needed after initial installation is successful. If focus adjustment is desired it is to be done with the iris wide open and the adjustment is accessible in the front underside of the lends through an access hole in the iris ring that only lines up at the wide open position. A 1/16” hex key is used to adjust the focus.


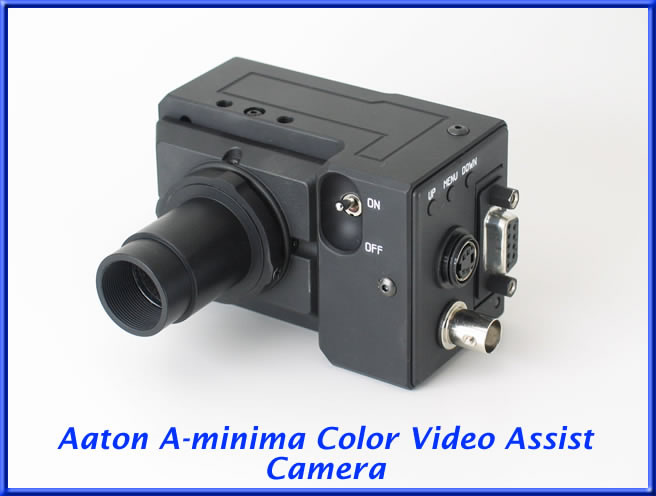
DeFoe Technical Color Video Assist Camera

On Screen Menu Navigation and adjustments


Pushing “MENU” scrolls through the main menu screens. Pushing UP /

Down makes direct adjustment to that menu function or displays any

available submenus. Once a submenu is displayed, pushing MENU

selects it, then UP / DOWN will make adjustment.

Going through to the end of the main menu displays gets to a blank

screen again.

Example: Push MENU until the AGC gain mode displays. Then push up

or down to scroll to “MANUAL”. Then push Menu to select it and the

adjustment screen displays. Now Pressing UP or DOWN adjusts the

gain. Push menu again to go to next function.


White balance- Push Up or Down to select from:

        3200K

        4600K

        5600K

        Auto

       Manual -then push “Menu” , a scale displays and UP / DOWN now  

                       adjusts.

       One Push – Push “MENU”,  “Ready” flashes, Push “UP” the word  

               “ON” flashes as the adjustment occurs. Then Ready flashes  

                 again and it can be repeated. This is to be done    

                 showing the camera  white subject matter well exposed. Push  

                “MENU” to exit to the  next item which is shutter.


Shutter - Push Up or Down to select from:

      CCD Iris is best overall general purpose setting. Allows shutter

                function to be part of auto  exposure regulation.

      Off (1/60 se (NTSC) ,  1/50th sec (PAL)

      Selectable shutter speeds; 1/125, 1/250, 1/500, 1/1000, 1/2000, 1/4000,

               1/10,000. Note that 1/20,000 and 1/40,000 are options on some

               revisions.

      Flickerless 1/100th NTSC, 1/120 PAL (not related to flicker reduction

               in cinema application) *set at OFF or CCD Iris for “Sensitivity  

               Mode” to work.


AGC Push Up or Down to select from:

          OFF (Gain is fixed at minimum 0 db)

          AGC +12db   (Auto gain 0 to + 12 db)

          AGC  +24db  (Auto gain 0 to +24db)

          Manual – Push “Menu” to display scale, push Up or Down to  

                           adjust 0 to + 24db


Back Light compensation - Push Up or Down to select from:

          Pattern 1

          Pattern 2

          Pattern 3

Iris Level - Push Up or Down to adjust. This adjusts video level in CCD Iris AGC.


Gamma - Push Up or Down to select from:

               .45 correction- produces brighter but perhaps grainier images

                       in lower light.

               .6   correction

              1.0 Linear. Perhaps the cleanest smoothest images.


Scan Reversal – On reverses the image on screen left to right. This is

         necessary on some camera Installations to achieve a correct image.


Sensitivity Mode - Push Up or Down to select from:

       Auto – The camera decides based on light level if it should use the

                 sensitivity setting  set in  the “Sensitive” mode- the next menu.

       Manual – The camera will operate in the sensitive mode it is told to

                 in the “Sensitive” mode  the next menu.


Sensitive - Push Up or Down to select from

                 OFF, 2F, 4F, 8F, 16F, 32F, 64F 2F is 2 times the exposure time

                  4F is 4 times the normal exposure… Note:  Shutter should be        

                  Set to “CCD Iris”


Notes: Some software revisions do not have a “Sensitivity Mode” option

and operate in an auto manner. Regulating physical iris and adjusting 

“IRIS”  toward “max” and the use of backlight settings  will allow the

camera to remain in sensitive operation in bright situations that would

otherwise cause the camera to automatically revert to normal function.


DeFoe Technical Services 2530 Evergreen Dr. San Bruno CA 94066 USA Ph/Fax (650)742-9702 email; service@defoetech.com